Last week, my task was to create little goodies for L to take into preschool for his pals and teachers. They were super simple to make and took no time at all.
For the kids:
I came across these adorable tags on Etsy. I figured rather than wasting the time to try to recreate them, I would just pay the $5 and have them emailed to me. Needless to say, I had them in about 15 minutes after I ordered, so that expense was a no brainer for me!!
Then, I gathered up my "ingredients"...
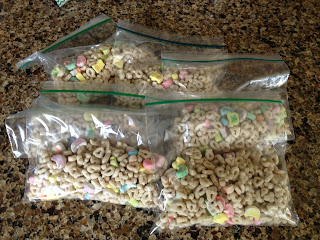
...placed the cereal in bags....
...and stapled the cute little tags on top.
It really doesn't get much easier!!
For L's teachers, I made up little silver pails with gold wrapped treats (Rolo's, Hershey Nuggets with Almonds and Toffee, and Twix.). I mixed the candy in the pail, dropped the pail in a clear treat bag (bread loaf size), and the used some green ribbon to close it up.
I found the adorable tags here, and used some ribbon to tie them on too.
Doesn't get much easier than that!! Stay tuned for Easter goodies :-)
Tales of delictable treats for your tummy and your home....and other things I find downright fabulous!
Showing posts with label kid friendly. Show all posts
Showing posts with label kid friendly. Show all posts
Saturday, March 16, 2013
Monday, February 25, 2013
Homemade Fruit Snacks
These little goodies have been on my list of things that I've been dying to try to make for some time now. Since L is obsessed with gummies, I figured they would be right up his alley and a healthier version than the store bought ones. Unfortunately, they did not quite live up to my expectations, as I was hoping they would be a little more flavorful. Maybe I just didn't use enough fruit. Maybe blueberries were not the best choice. Anyway....they were really easy to make and I'll probably try strawberry next time around.
I started off by putting my frozen blueberries in a small sauce pan with orange juice (alternatively, I could have used lemon juice).
They were heated up until the blueberries became soft. Then I added the honey and stirred it up.
Next, I took my immersion blender and pureed the mixture until it was smooth. If you don't have an immersion blender, you could use a regular blender, but be very careful as warm things have a tendency to splatter when mixed.
Let the mixture sit for about 10 minutes and then whisk in unflavored gelatin. After I had it whisked pretty well, I put the mixture into my blender and pureed it to make sure there were no lumps.
Since I made a double batch, I poured the mixture into a 9x13 pan and then let it hang out in the refrigerator for a few hours.
Once they were set, I cut them up into small pieces and placed them in an air tight container. You can keep them in the fridge or at room temperature. I think they are a good snack. L really isn't a fan and I'm chalking that up to the blandness of these.
If you make them and they turn out great, let me know what fruit you used and if it was frozen or fresh.
Friday, January 18, 2013
Coconut Banana Bread
This morning, Landon and I had some friends over to play. I had a craving for some sort of a sweet bread, so, when I came across this recipe, I knew it was a no-brainer as it combined two of my favorite criteria....healthy and coconut. I had most of the ingredients on hand already and it was super easy to whip together.
First, I rounded up all my ingredients. I think the only ones I had to buy were skim milk and greek yogurt!!
Then, mixed the dry ingredients together...
Then mashed up the bananas with a fork and mixed with the brown sugar and vanilla...
Then, added the egg whites and mixed...
Then, added the oil and mixed... (do you see a pattern forming?!?!)
Then, added the flour mixture in three batches and mixed between additions...
Then, added the greek yogurt, orange juice, and milk, and mixed.
And finally, added some coconut, and mixed.
Once everything was combined, I poured it into an 8.5" loaf pan (recipe called for 9x5" but I just used what I had) and sprinkled the remaining coconut on top.
After an hour of baking and cooling, I sliced this baby up and volia....coconut banana bread.
With Spring just around the corner (hopefully...I know we still have a few months to go, but, a girl can hope, right?!?!) you will be seeing a lot of coconut recipes popping up since I have a slight obsession for the flaky sweet :-)
Coconut Banana Bread (from fitsugar.com)
Ingredients
1 ¾ cup all-purpose flour
1 teaspoon baking powder
1¼ teaspoon baking soda
3 Large ripe bananas, mashed
½ cup + 2 tablespoons sweetened flaked coconut
½ tablespoon olive oil
1 teaspoon vanilla
½ cup of brown sugar
3 egg whites
2 tablespoons skim milk
¼ cup fat free plain Greek yogurt
¼ cup orange juice
Directions
- Preheat oven to 350 degrees.
- Mix flour, baking powder, baking soda together in mixing bowl.
- In separate large mixing bowl combine mashed bananas, brown sugar, and vanilla. Add egg whites and mix together until smooth. Next add oil. Then, slowly add in flour and combine until moist. Next add Greek yogurt and orange juice. (Depending on the consistency you can add two tablespoons of skim milk. If you like your bread more dense —omit the milk — but if you like it more airy or lighter you can add it.) Lastly add ½ cup of coconut and mix together.
- Pour into greased 9×5 inch loaf pan. Sprinkle two tablespoons of coconut on top.
- Bake for 50-60 minutes or until toothpick comes out clean and the bread is golden brown.
Thursday, January 17, 2013
Gettin' Figgy With It
I came across a recipe for Fig Foldovers in the February 2013 edition of Parents Magazine and knew these were a must make based on my family's love for this delectable soft cookie. I'm not going to lie, they did take a bit longer to make than I thought they would, but, in the end it was so worth it.
First, I gathered all my ingredients for the bars (missing from photo is salt).

Then, I took my figs, cut off the stems, and placed them (a few at a time) into my mini food processor to chop them up.
After that, I put the figs, brown sugar, zest, and OJ into a saucepan and brought it to a boil, then simmered until most of the liquid was evaporated.
Once that was done, I took it off the stove to cool a bit before putting it back in my mini food processor and making the mixture nice and smooth.
Then it was time to make the dough. I creamed butter in my mixer and then added granulated sugar.
Next came the eggs and sugar.
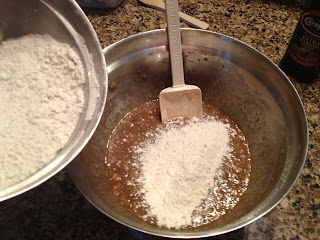
Then I combined flour, baking powder, cinnamon, and salt in a bowl, and beat it into the butter mixture on low.
Once my blob of dough formed, I divided it up into four smaller balls.
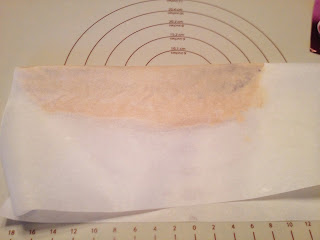
Then rolled it out between two pieces of parchment paper.
After that, I gently peeled off the top layer of parchment and spread 1/4 of the fig mixture down the middle of the dough.
I discovered that folding the dough over was much easier if you just folded the bottom parchment along with it and gently pressed it down then peeled it back.
Then, I cut the dough into 10 pieces (the recipe said 12 but I wanted them to be more of a normal cookie size). Since I can't roll out a perfect rectangle, some were bigger than others.
After cutting, I placed the bars onto a parchment lined cookie sheet and baked at 350 degrees for 15 minutes (adding a few minutes on the end for one tray to get a little more golden on the bottom).
While they were baking, I made the glaze, which consisted of powdered sugar, milk, and vanilla.
It was a little stiff for my liking, so I added a smidge more milk.
Voila, runny, drizzleable (is that a word??) icing.
When the bars were done, I transferred them to a wire rack to cool off a bit.
MMMM....looks so yummy!
Then drizzled them with the glaze.
My #1 critic thoroughly enjoyed them!!!!
Although, since I was distracted in the kitchen, this is what happened to my living room. Ah, boys!
And FYI- these are not the figs you want to use for this recipe. Be sure to get the Mission Figs (I found them at Wegman's). G has been enjoying snacking on these though, so they weren't a waste.
Hope you enjoy making these. Although a bit laborious, they are SOOO worth it!
Fig Foldovers (from Parents Magazine, February 2013)
Active Time- 25 mins
Total Time- 1 hour
Makes- 48 bars
8oz dried Mission figs, stems removed, chopped (1.5 cups)
1/4 cup packed brown sugar
1 1/2 tsp finely shredded orange zest
1 cup orange juice
1 cup salted butter, softened
1 cup granulated sugar
2 eggs
1 1/4 tsp vanilla extract, divided
3 cups all purpose flour
2 tsp baking powder
1/2 tsp ground cinnamon
A dash of salt
1/2 cup powdered sugar
2-3 tsp of milk
In a saucepan, bring figs, brown sugar, zest, and juice to a boil, lower heat. Simmer, uncovered, for 15 minutes or until nearly all of the liquid has evaporated, stirring occasionally. Remove from heat and let cool. Mix in a food processor or a blender until smooth.
Preheat oven to 350 degrees. In a bowl, beat butter on medium to high speed for 30 seconds. Add granulated sugar, beat until combined. Beat in eggs and 1 tsp of the vanilla. In a bowl, stir together flour, baking powder, cinnamon, and salt. Beat into butter mixture on low speed.
Divide dough into 4 pieces. Roll each between parchment paper into a 12x5" rectangle. Spread 1/4 cup fig mixture down the middle of each rectangle. Fold rectangles in half lengthwise over filling; seal edges with the tines of a fork. Cut crosswise into 12 slices. Place 2 inches apart on parchment on a cookie sheet. Bake 15 minutes, or until lightly browned. Remove; cool on rack.
Stir together powdered sugar, remaining vanilla, and milk; drizzle over bars. Allow to set.
First, I gathered all my ingredients for the bars (missing from photo is salt).

Then, I took my figs, cut off the stems, and placed them (a few at a time) into my mini food processor to chop them up.
After that, I put the figs, brown sugar, zest, and OJ into a saucepan and brought it to a boil, then simmered until most of the liquid was evaporated.
Once that was done, I took it off the stove to cool a bit before putting it back in my mini food processor and making the mixture nice and smooth.
Then it was time to make the dough. I creamed butter in my mixer and then added granulated sugar.
Next came the eggs and sugar.
Then I combined flour, baking powder, cinnamon, and salt in a bowl, and beat it into the butter mixture on low.
Once my blob of dough formed, I divided it up into four smaller balls.
Then rolled it out between two pieces of parchment paper.
After that, I gently peeled off the top layer of parchment and spread 1/4 of the fig mixture down the middle of the dough.
I discovered that folding the dough over was much easier if you just folded the bottom parchment along with it and gently pressed it down then peeled it back.
Then, I cut the dough into 10 pieces (the recipe said 12 but I wanted them to be more of a normal cookie size). Since I can't roll out a perfect rectangle, some were bigger than others.
After cutting, I placed the bars onto a parchment lined cookie sheet and baked at 350 degrees for 15 minutes (adding a few minutes on the end for one tray to get a little more golden on the bottom).
While they were baking, I made the glaze, which consisted of powdered sugar, milk, and vanilla.
It was a little stiff for my liking, so I added a smidge more milk.
Voila, runny, drizzleable (is that a word??) icing.
When the bars were done, I transferred them to a wire rack to cool off a bit.
MMMM....looks so yummy!
Then drizzled them with the glaze.
My #1 critic thoroughly enjoyed them!!!!
Although, since I was distracted in the kitchen, this is what happened to my living room. Ah, boys!
And FYI- these are not the figs you want to use for this recipe. Be sure to get the Mission Figs (I found them at Wegman's). G has been enjoying snacking on these though, so they weren't a waste.
Hope you enjoy making these. Although a bit laborious, they are SOOO worth it!
Fig Foldovers (from Parents Magazine, February 2013)
Active Time- 25 mins
Total Time- 1 hour
Makes- 48 bars
8oz dried Mission figs, stems removed, chopped (1.5 cups)
1/4 cup packed brown sugar
1 1/2 tsp finely shredded orange zest
1 cup orange juice
1 cup salted butter, softened
1 cup granulated sugar
2 eggs
1 1/4 tsp vanilla extract, divided
3 cups all purpose flour
2 tsp baking powder
1/2 tsp ground cinnamon
A dash of salt
1/2 cup powdered sugar
2-3 tsp of milk
In a saucepan, bring figs, brown sugar, zest, and juice to a boil, lower heat. Simmer, uncovered, for 15 minutes or until nearly all of the liquid has evaporated, stirring occasionally. Remove from heat and let cool. Mix in a food processor or a blender until smooth.
Preheat oven to 350 degrees. In a bowl, beat butter on medium to high speed for 30 seconds. Add granulated sugar, beat until combined. Beat in eggs and 1 tsp of the vanilla. In a bowl, stir together flour, baking powder, cinnamon, and salt. Beat into butter mixture on low speed.
Divide dough into 4 pieces. Roll each between parchment paper into a 12x5" rectangle. Spread 1/4 cup fig mixture down the middle of each rectangle. Fold rectangles in half lengthwise over filling; seal edges with the tines of a fork. Cut crosswise into 12 slices. Place 2 inches apart on parchment on a cookie sheet. Bake 15 minutes, or until lightly browned. Remove; cool on rack.
Stir together powdered sugar, remaining vanilla, and milk; drizzle over bars. Allow to set.
Subscribe to:
Posts (Atom)


